How to wire an Ethernet wall socket

How to Wire an Ethernet Wall Socket
Wiring an Ethernet wall socket is a practical way to provide a stable, high-speed internet connection to various rooms in your home or office. Whether you’re upgrading your network or setting up a new one, learning how to wire an Ethernet wall socket can make your network more reliable and tidy. Here’s a step-by-step guide on how to wire an Ethernet wall socket correctly.
Why Wire an Ethernet Wall Socket?
An Ethernet wall socket allows you to connect devices to a wired network, which is faster and more stable than wireless connections. By running Ethernet cables through your walls and installing outlets in rooms where you need internet, you can ensure a reliable network throughout your space.

Tools and Materials You’ll Need
Before you begin, gather the following tools and materials:
- Ethernet wall plate/socket
- Ethernet cable (Cat5e or Cat6)
- Ethernet jacks (keystone jacks)
- Wire stripper
- Crimping tool
- Screwdriver
- Punch-down tool (optional but recommended)
- Drill
- Cable tester (optional but useful for ensuring correct wiring)
Step-by-Step Guide: How to Wire an Ethernet Wall Socket
1. Choose the Right Location
The first step is to decide where you want to install the Ethernet wall socket. Ideally, the socket should be near the devices that require a wired connection. Keep in mind that the distance from your router to the socket should not exceed the maximum recommended cable length (typically 100 meters for Cat5e or Cat6).
- Tip: Make sure the socket is installed at a comfortable height and is not obstructed by furniture or other objects.
2. Turn Off Power
Before you begin any work, ensure that there’s no electrical current flowing through the area where you’re working. Although Ethernet wiring doesn’t carry significant electrical current, it’s always a good idea to turn off the power to avoid any accidental damage.
3. Drill Holes for the Outlet Box
You’ll need to drill holes to install the outlet box, which will house the Ethernet wall socket. Choose a location that’s convenient but doesn’t interfere with structural elements like studs or pipes.
- Use a stud finder to ensure you’re not drilling into studs.
- Drill a hole large enough for the outlet box to fit snugly.
4. Run the Ethernet Cable
Next, run the Ethernet cable through the wall to the outlet box. If you’re running cable from a central location like a router or switch, make sure to use the proper cable length to reach the new outlet.
- If the cable needs to travel through multiple walls, you may need a fish tape or a wire-pulling tool to guide the cable through the wall.
- Be sure to leave enough cable inside the outlet box to make the necessary connections.
5. Strip the Cable
Once the Ethernet cable is in place, use a wire stripper to strip back about 1.5 inches of the outer insulation. This will expose the inner wires, which are color-coded to help with correct wiring.
- Be careful not to nick or cut the inner wires.
6. Prepare the Wires for the Jack
Inside the Ethernet cable, you will find eight individual wires, each with a different color. For standard Ethernet wiring, you’ll need to arrange the wires in a specific order. There are two wiring standards: T568A and T568B. Both standards are acceptable, but you should use the same standard on both ends of the cable.
- T568A wiring order:
- White/Green
- Green
- White/Orange
- Blue
- White/Blue
- Orange
- White/Brown
- Brown
- T568B wiring order:
- White/Orange
- Orange
- White/Green
- Blue
- White/Blue
- Green
- White/Brown
- Brown
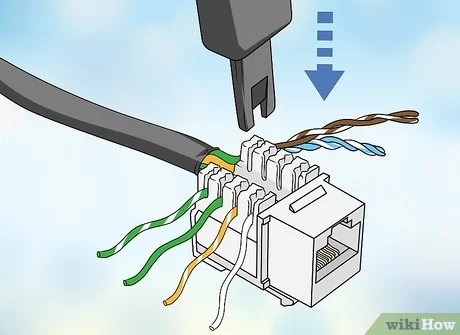
7. Insert the Wires into the Keystone Jack
Using the color-coded wiring order you’ve chosen, insert each of the eight wires into the corresponding slots on the keystone jack. A punch-down tool can be used to secure the wires into place. Push the tool down firmly to make sure each wire is securely attached.
- Tip: Make sure each wire is pushed all the way into the slot, as poor connections can lead to network issues.
8. Mount the Keystone Jack into the Wall Plate
Once the wires are secured in the keystone jack, snap the jack into the wall plate. The wall plate typically has a slot that holds the keystone jack in place.
- Tighten the screws on the wall plate to ensure it is mounted securely to the outlet box.
9. Test the Connection
Before you finish the job, it’s important to test the Ethernet connection. Use a cable tester to check whether the wiring is correct and if there’s any faulty connection. This ensures that the Ethernet jack is wired properly, and the connection will work once it’s installed.
10. Secure and Close the Wall Plate
Once you’re confident the wiring is correct and the test passed, attach the wall plate to the outlet box. Tighten the screws to keep the plate firmly in place.

Conclusion
Wiring an Ethernet wall socket is a straightforward task, but it requires attention to detail. By following the steps above and using the correct tools, you can successfully wire a socket that provides a reliable, wired internet connection. Whether you’re setting up a new network or upgrading an existing one, this DIY project will give you a permanent, high-speed connection in any room.


